What Do You Want To Know About Candle Making?
What Do You Want To Know About Candle Making?
Candle Making Projects
These candles are made from canes of bamboo with a candle at one end that is formed by the dipping method. Take a cane of bamboo and wrap 15-20 cm of one end in brown parcel paper. Do this by taking a 5cm wide strip of paper about 50 cm long. Apply wax glue to one side and wind the paper diagonally along the end of the cane to cover it. Tuck the overhanging end of the paper into the tip of the cane. Melt and colour paraffin wax in a dipping container. When the wax is about 70 degrees C (160 F) begin dipping the paper covered end of the cane into the wax. Each dip will last for about 3 seconds, leaving 1 minute intervals between dips. Keep dipping until the wax is about 2.5 cm (1 inch) thick. Add more wax to your dipping pot as necessary. Be sure to keep the wax at about 70 degrees for dipping. Take a thick wick and prime it in the melted wax. Leave it to cool, then wind it diagonally around the wax coated end of the cane. Leave some wick overhanging at the top, and secure the wick at both ends with wax glue. Begin dipping again until the wick is covered and the candle looks relatively smooth. Before the candle hardens completely, trim away the wax from the wick overhang at the top, so you can light it properly later.
These candles consist of stacks of geometric shaped wax slabs of about 1-2 cm thick. Prime a wick with melted wax for later. Pour coloured melted wax into a metal baking pan, to a thickness up to 2 cm. Before the wax hardens completely, cut out your shapes, using a cardboard template as a guide. You can use all one shape, such as squares or triangles or a combination of shapes. Make a wick hole in the centre of each shape and leave to cool and harden completely. Lift each cut out shape out of the pan. Take your primed wick and attach a wick holder to one end. Take each shape and thread it onto the wick arranging each shape at a slightly different angle for effect. You can make alternate coloured layers, or try using a cookie cutter for even more varied shapes.
This decoration involves rubber stamping on a piece of tissue paper, embossing (optional) and then using a heat gun to attach the decorated tissue to a candle.
Place the piece of tissue paper with the stamped image wherever desired on the candle and hold it in place with just the tiniest dot of glue. Aim a heat gun at the image. The wax will melt when the heat hits it, and it will be forced through the paper or over it, depending on the weight of the paper being used. The stamped image will then be permanently attached to the candle.
This technique can be used on candles of any size, but it is especially effective on the large candles that burn down in the middle and allow the light of the flame to shine through the wax and the stamped tissue.
Try this technique too: Rubber stamp a design on a white paper napkin. If you use party napkins that can be peeled apart, stamp the image on the top layer of the paper then peel the other layers off. The remaining piece is so thin it will adhere in a moment.
You can decorate candles in this manner even if you do not own a rubber stamp. Simply cut or tear out a pattern or picture
from a paper napkin and apply it in the same manner. The background of the napkin must be either white or a light color that
matches the candle.
CRACKS, STAR BURSTS AND INTERNAL MOTTLING
1. Freeze the candle mould before you pour the wax. The cold will 'shock' the hot paraffin into all sorts of unique and
unpredictable patterns as it cools. There are lots of ways to do this, how it ends up looking depends on your
wax formula. Be careful, make sure your mould is stabilized when you pour. Wax and water mixed can really pop, be careful!
Water droplets will form on the mould while it is freezing, due to condensation. The amount of water shouldn't be a problem
when burning the candle, if you don't leave the mould in the freezer for more than an hour.
Here are some ways to do it:
A. If the mould is small, just put it in the freezer and pour the wax right away after removal from the freezer.
B. Pack the mould in ice.
C. Pack the mould in dry ice.
Try pouring a layer, let it jell over a little, then pour another layer, for some interesting effects.
2. Pour a moulded candle as usual. Put it in the fridge to cool fully. When you take it out of the fridge, run hot water over
the outside of the mould to melt the surface layer of wax. Put it back in the fridge for an hour. When it comes out of the
mould the surface will be crackled and textured.
Get some taper candles... whatever colour you want. Dip the exposed wick in melted paraffin so it won't get wet in the
process to follow:
90% paraffin melt point 131F/55C
6% stearic acid
2% micro 180 wax
2% lustre crystals
Use a metal core wick and wick tabs, Pour the wax when it gets to 190 degrees unless the mould mfg instructions say
differently.
You can remelt candles and repour them into moulds or new containers.
Make the same kind of candle that the old wax was.... that is, if you have old container candles, use the wax for new container
candles. If you have old free standing candles (moulded candles) use the old wax for new moulded candles. This way you will
probably have the correct melt point wax for the type of candle you are making.
Melt down the candles, remove debris or pieces of old wick. You can strain wax through a nylon stocking stretched over a
metal container.
You can make your own paraffin sheets. Just melt some paraffin, colour it and scent it if you want, and pour it into a wax
paper lined cookie sheet with sides. Let is harden a little, until it is still pliable but won't burn you. Then gently separating
the paper from the wax, roll it up into a candle. Try embedding herbs or spices in the pliable wax before you roll it up.
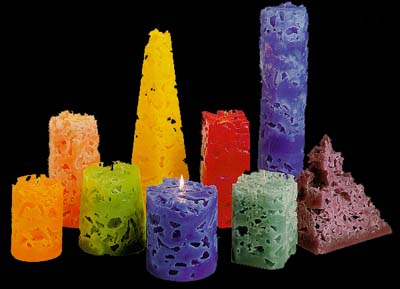
Lacy, intricate ice candles are full of holes where the ice melted as you pour the hot
wax into the mould.
You can try making the candle with different sized ice cubes. Small ones
leave small holes, etc.
Cut the top off an acorn squash. Remove the seeds and innards. Use this hollow squash for a candle mould.
You can thread a wick through the bottom of the squash using a long upholstery needle or other large needle. Seal the
bottom with a bit of putty. Stand the squash in a large glass to keep it level. Pour your melted paraffin, remembering to
keep some in reserve to fill the shrink well as the candle cools. You may have to do this several times, poking a small hole
along the wick to relieve any trapped air. When your candle is fully hardened, cut away or peel away the squash shell and
you are left with a wonderfully shaped unique candle. The flesh of the squash will leave a rustic patina on your candle as
well. Flatten the base of your candle by rubbing it in an old fry pan on low heat.
Fill a balloon with water to the desired size. Dip the balloon in wax, make sure it is somewhat cool. Continue dipping the
balloon until a hard shell has formed around it. Carefully pop the balloon at the top, and empty out the water. Pull the
balloon out of the wax shell. Pour a small amount of wax (a different colour from the first) into the shell. Roll it around in the
shell, making sure all areas are covered, until the wax is dry. Continue doing this with different colours until the shell is
almost filled. Insert the wick during the last fill. Once the candle is cool, use a potato peeler or something similar to shave
the top of the candle, making it smooth and flat.
These candles turn out to look something like a geode. They are a little time consuming, but the end result is fantastic!!
Hope my suggestion comes in handy!!
Michelle from Indiana
(Thanks Michelle for a great idea!)
 Fruit candles are easy. Fill a jar with water and your favourite colourful fruit slices. Put a floater candle on top,
and enjoy! For a sparkling clear candle, change the water daily. The fruit will last a couple of days depending on
the weather.
Fruit candles are easy. Fill a jar with water and your favourite colourful fruit slices. Put a floater candle on top,
and enjoy! For a sparkling clear candle, change the water daily. The fruit will last a couple of days depending on
the weather.
Ways to Attach Fruit, Herbs, Flowers Leaves, and Spices
 Stick pressed flowers or leaves to the outside of a finished candle by dipping the flower in uncoloured melted
wax and pressing it gently to the surface of the candle. Then take the candle by the wick and dip the whole
thing into the melted wax once or twice to form a seal over the flowers, but still let them show through the glow
of the burning candle. The most lightly coloured or non coloured wax works best with this decorating idea. The
flowers can be seen better.
Stick pressed flowers or leaves to the outside of a finished candle by dipping the flower in uncoloured melted
wax and pressing it gently to the surface of the candle. Then take the candle by the wick and dip the whole
thing into the melted wax once or twice to form a seal over the flowers, but still let them show through the glow
of the burning candle. The most lightly coloured or non coloured wax works best with this decorating idea. The
flowers can be seen better.
Ground cinnamon or other aromatic spices added to the melted wax are nice. They tend to settle to the bottom of your
candle a bit , but this looks nice. Glitter and confetti can be used also.
You can add shells, for example, in different ways.
1. Take a finished candle and dig out pieces of wax from the surface of it. Make the holes about the same size as your shell. Glue the shell into the prepared hole and take a blow torch or hair dryer and pass it over the area a few times to smooth the area by melting it a bit.
2. Use a pillar mould with a mould sleeve insert. A mould sleeve insert is the same shape as the regular mould, but small in diameter. Place the insert inside the mould. Fill the space between the insert and the regular mould with you shells and pour your wax. The wax will fill up the entire thing, inside and outside the walls of the insert. Tap the mould to get the air bubbles out from between the shells.
3. Use a pillar mould and instead of a sleeve insert, use a pre made pillar candle the same shape as your mould. Place it in the mould, and fill the space with shells, pour a higher melt point wax over the shells (higher mp than that of the pre made candle if possible).
For method 2 and 3 also cool the mould in a cool water bath after pouring the candle
Stick whole cinnamon sticks vertically around the outside surface of your candle by painting one side of
the stick with melted wax. You can also line your mould with cinnamon sticks and a good deal of melted
wax before you pour the mould. Let it harden and then fill the rest of your mould with wax. This gives a
very rustic look.
Try the same techniques using miniature candy canes for Christmas candles. The candle will have a nice subtle sweet mint
aroma.
Try attaching dried blood orange slices, or whole spices to the outside of a finished candle using melted wax and a
paintbrush, or clear drying craft glue such as Elmer's. To dry the fruit slices, put them in a 150 (65C) degree oven for several
hours on a piece of parchment. You can also dip the dried fruit slices right into melted clear paraffin for a few seconds and
then press them onto your candles. Don't burn your fingers, use tweezers to hold the fruit and a chop stick or tongue
depressor to press the fruit onto your candle.
Variations on tapers
Making Bubbly candles on purpose. Dipping a finished candle in melted paraffin that isn't at its hottest will result in a thin
layer of bubbles over your candle surface which is very attractive in a rustic way. I made some tapers, using 145 (62
C)degree melt point wax. For the last two or three dips, I let the melted wax cool off to about 120 (50C) degrees.
Floral, Herbal, grubby and Hurricane Candles:
Make a paraffin pillar candle, wait till it's totally dry and set it inside a mould that's a little bigger around. Then sprinkle potpourri or dried herbs and flowers around the candle and fill around the sides with more wax. That way the flower pieces won't be in the middle part that burns. The outside wax should be a harder (higher melt point) wax than the inside candle so the outer floral shell doesn't melt.
I also made a regular moulded candle, let it cool completely and fixed some dried pressed flowers to the candle using melted wax and a paintbrush. To seal the flowers, I then dipped the whole candle in clear melted paraffin at a temperature of about 120 degrees (it was 138 melt point wax). I dipped it twice, and the flowers show through nicely, and there are bubbles in this outer layer of wax.
You can spray candles with non flammable craft spray paints. An under layer of deep blue, red or green looks nice with a
dusting of gold or bronze paint over it.
To make rustic looking candles with a sandy looking surface, pour the wax cold... just as it begins to thicken.
Cake Candles, Whipped Wax 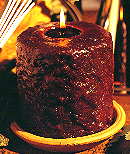
You make a normal pillar candle, let it cool and harden and remove it from the mould. Then apply the outer coating of wax in
whatever style or effect you want:
Whipped,
Stippled
Herb or flower, potpourri, sand or whatever encrusted
To do this, just melt some more paraffin. You can colour it if you want. Use a higher melt point type of wax than used in the
original candle if possible.
Take it off the heat and use a hand mixer or wire whisk to whip up the wax for a minute or so. Then paint the whipped wax
onto the outer surface of your candle with a stiff paintbrush or a tongue depressor or other stick type implement. It may help
if you slightly melt the outer surface of the core candle a bit with a hairdryer or rub it around in an old fry pan. The new wax
layer will adhere better to a layer of slightly warm/melted wax.
I haven't tried this, but some say a pinch of cream of tartar in the whipped wax helps it to adhere better.
To make variations, add other materials to the whipped wax before you apply it to the candle: Sand , herbs, potpourri.
Or to get a stippling effect, apply the wax to the candle, then go over it in a gentle jabbing manner with a very stiff stencilling type brush at a 45 degree angle to the side of the candle.
Or, don't whip the wax, just paint it on thickly (let it cool a bit before you start) Then roll then entire candle in sand or dried herbs or potpourri and it will stick. Let this cool fully,
You can then over dip the entire candle to seal it and give it a shiny surface if you wish.
The higher melt point of the outer layer of wax will let it stay fairly intact while the core candle burns down naturally. Then
your herbs or flowers won't get into the melt pool of the core candle and catch on fire.
These paper coated wax parcels will help start wood fires. They are made from paraffin, poured into egg cartons and hardened by cooling. You can mix sawdust shavings with the melted wax before it hardens, to improve its fire lighting properties. Only use these in a fireplace, they are not candles and are not designed to burn in a safe manner.
What Do You Want To Know About Candle Making?